Mega Sale Domains @ Rs.99

Thursday, March 15, 2012

Vital Facial Massage Cream

Vital Facial Massage Cream


  • A light textured cream specially formulated to replenish natural oils & moisture lost with in the passage of time.
  • Easily absorbent leaving the skin nourished, moisturized and de-stressed.
  • Revitalizes skin cells slowing the aging process, thereby preventing wrinkles and imparting a youthful firmness to the skin. Suited tor all skin types.

How to Use: Massage generously over clean face and neck in upward-outward direction for 10-15 minutes.

Herbal Peel

Herbal Peel

Herbal Peel


We have in store for our clients, a deep pore cleansing herbal peel that is made from natural ingredients for smoothing the texture of skin and thereby beautifying it. This herbal peel that we supply is used for removing dead cells and blackheads on the facial skin by cleaning the pores. This is a highly effective peel and is apt for oily or combination skin types. Application Method: Take a small quantity, mix it in milk/curd and leave it for fermentation for 5-7 minutes. Apply a thick layer on the face and neck. Wash off after it is dry.

  • A Deep pore cleanser that discourages blackheads. Improves skin texture by removing dead cells & cleaning skin pores.
  • Helps to smoothen & beautify the skin.

How to Use: Mix required quantity in milk/curd, leave it for fermentation for 5-7 minutes. Apply liberally on face and neck let it dry

Jojoba Scrub

Jojoba Scrub

The structure of jojoba oil is very similar in composition to human natural skin oils. A excellent moisturizer ad is deal for all skin types.

* It can effectively soften the dark keratin cells of epidermis.
* It promotes metabolism beneath the skin.
* Makes skin sparkling naturally fair, tender and healthy.


How to Use: Massage lightly in circular motion with finger tips on moistened face and throat for about 2-3 minutes. Rinse well with water.

Wednesday, March 14, 2012

Walnut Scrub (Dead Cell Remover

Walnut Scrub (Dead Cell Remover)

Walnut Scrub (Dead Cell Remover)


A beneficial scrub for dead cell removal & for patchy skin made from walnut extracts. It Unclogs pores reactivating the weaker cells giving a youthful glow to the skin. How to Use: Take a small quantity on fingertips and apply on the face avoiding the eyes. Scrub with light pressure in small circulatory motion for 2-3 minutes and wash off well with clean water.

Giving yourself a facial massage

Facial Massage

* master cleanse
* dry skin treatments
* facial massages
* aromatherapy oil

Giving yourself a facial massage
really helps in preventing premature aging. Warming, soothing and relaxing, it helps to release tension, improve the lymphatic system and improves the circulation, as well as improving muscle tone.

The above are a few good reasons to either give yourself or treat yourself to a facial at a salon. If you go to a salon, it's a great way to relax and great pick me up for your skin. Don't worry if you have make up on as the therapist will, as part of your deep facial cleanse, remove your make up. Also included in every facial is a facial massage using some wonderful aromatherapy oils. If you decide to massage yourself, make it part of your cleansing routine before bedtime. Use one of our aromatherapy oil recipes below, choosing one to suit your skin type.

Because it is so hard to describe a facial massage I have found a very good video. In this case pictures speak so much louder and make it much easier to understand than words. Below the video is you will find our massage oil recipe to give you a salon experience, if you prefer to buy a massage oil try this one Dermalogica PreCleanse which has a wonderful fresh herb/pine smell.

Massage oil gives slip and prevents friction. Choose two aromatherapy oils and follow our recipe below.

For normal skin choose between these essential oils : lavender, rose, cypress, geranium, chamomile, geranium, rosemary, neroli

For oily skin choose between these essential oils : tea tree, manuka, lavender, ylang ylang, tea tree, petitgrain, grapefruit, sandalwood

For dry skin choose between these essential oils : lavender, cedarwood, clary, jasmine, geranium, mandarine orange, neroli, rose, petitgrain

For mature skin choose between these essential oils : frankincense, neroli, chamomile, lavender, rose, geranium

For sensitive skin choose these between these essential oils : lavender, chamomile

Home-made Facial Massage Oil

* 15ml extra virgin olive oil or almond oil
* 5 drops of your first choice of aromatherapy oil
* 5 drops of your second choice of aromatherapy oil
* Or choose 10 drops one one aromatherapy oil

Place the virgin olive oil into a dark bottle as this will help prevent the sun destroying the essential oils. Now pour 5ml of your first choice of aromatherapy oil into the bottle and then 5mls of your second choice. Put the top on the bottle, donĂ¢€™t shake but leave it to stand and diffuse for at least 24 hours before using.

Ayurvedic Herbal Cure Blog

This Blog
Linked From Here
Ayurvedic Herbal Blog List
Ayurvedic Herbal Cure links
The Web
This Blog
Linked From Here

Ayurvedic Herbal Blog List

Ayurvedic Herbal Cure links


Give Yourself a Facial Massage

Facial Massage for a good blood supply and drainage of waste. Keep your face and your hands are clean before you begin.

You can remover pads or wipes beauty care cream between your fingers and your face.

1 Use your index fingers and middle fingers. Move your fingers down the outside of the forehead and work your way up your whole forehead.
2 Use the same fingers and move them over the eyebrows, starting at the nose. Then the same movement under the eye make. Close the eyes and rub their eyes
3 Now move from the sides of the nose to the forehead and the forehead to the temples, massaging her temples twice.
4 Now use four fingers of each hand, not the thumb from the mouth and move towards the temples. Make circular movements on the chin and move them up toward the nose and then back to the hood and on the forehead to the temples.
5 Now, use four fingers and move from the chin to the jaw line along the hairline along the sides of the face to the temples.

Finally pass from the neck to the neckline.

Japanese Facial

Japanese Facial Massage is a profound combination of traditional East Asian medical concepts and massage techniques that have been developed and modified from Anma (traditional Japanese massage) over the last five hundred years.

These therapeutic techniques stimulate facial nerves which reach the skin cells, to improve blood flow, nutrient distribution and the removal of toxins, impurities and dead skin cells.

This massage is the most effective natural treatment to enhance the condition of the skin and to minimize the aging process.

Facial Massage Thecniques

Facial Massage Thecniques


Facial massage is done to reduce the aging process and achieve younger looking and healthier skin. It is also used to relieve stress, migraine headache and nasal congestion due to sinus. Facial massage can be done by a professional massage therapist or simply at home. Massage of the face is usually done with the hands; however, mechanical massaging devices are also used in beauty salons or spas. A small amount of oil or lotion is often applied to facilitate movement over the delicate facial areas.
You can also go for an acupressure or yogic techniques for your facial massage.

The benefits of facial massage are as follows.

  • Improvement of facial skin and muscle tone.
  • Relaxation of facial and eye muscles
  • relief from tension headaches and facial pain
  • Alleviation of stress and anxiety
  • Overall physical and mental relaxation

When do you need a facial massage?
Given below are some very common conditions to know thr right time to go for a facial massage

Glowing skin
If your skin is becoming darker day by day due some physical or mental problems you can go for a facial massage right then to ensure a healthy and a glowing skin.

Puffiness
Some women have a tendency to develop puffiness on their faces. If you are suffering with such a problem then you can be relived by treating yourself with a facial massage.

Wrinkles
Wrinkles today is a very common problem both for aged and young women. Massage stimulates blood circulation and increases oxygen in the face which in turn reduces wrinkles.

Double chin
Regular face massage tightens the loose flesh under the chin reducing the problem of double skin and making it look younger.

Below mentioned is a simple yet very effective process which you can perform at home on your home.

  • You will need face massage cream that is readily available in the market, and a bowl of cold water.
  • Wash your hands and cleanse your face.
  • Sit back on a chair, and apply a generous amount of cream on your face and neck.
  • Massage it gently into your skin.
  • Take some cold water from the bowl, and apply it to your face as well. You could start from the neck.
  • Lift your chin up and massage your neck using upward strokes.
  • Then massage the area just under your skin. Use firm strokes.
  • Start from the center, move your hands under your jaw, outwards to the ear.
  • Do this around 20 times or more, depending on how much time you have, and then using small upward strokes, work the entire under-chin area from side to side.
  • Massage the rest of your face, using upward and outward strokes, and circular motions.
  • Keep reapplying water and cream on your face.
  • Circle your eyes, pressing down on the temples.
  • Similarly, use upward and outward strokes on your forehead.
  • Use quick, sharp slapping strokes on your cheeks.
  • Perform the total process with upward and outward strokes.
  • If you have a few pimples, wait until the pimples go, and use another cream the next time.
  • Wash your face with cold water after the massage.
When to consult an expert massage therapist.
When all the above techniques fail to heal your facial problem, pl

Just 20 Minutes Of Facial Massage Will Make You Look Younger, Improve Your Breathing And Leave You Blissfully Relaxed.

Just 20 Minutes Of Facial Massage
Will Make You Look Younger,
Improve Your Breathing
And Leave You
Blissfully Relaxed.

One of the key skills in aromatherapy is facial massage. Apart from being wonderfully relaxing it's a very simple way of stimulating both your lymphatic system as well as your accupressure points.What's great about it is it's a treatment that you can do for yourself, which will mean that you can see and feel benefits straight away.

I would recommend trying this for yourself to

Unblock sinuses

Exfoliate dead skin

Improve fluid retention problems like puffy eyes

General relaxation.

If you are using our Hayfever or Sinus treatements then really the most effective way that you can use them is to rub them into the skin over the sinus tracts as shown in figure 2

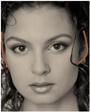
The migraine treatment is best rubbed onto the forehead as shown in figure 3.

If you decide to do a full facial massage, use a carrier oil or one of our blended massage oils and follow the diagrams.

If I were to do this as part of a full massage treatment or as a facial massage for a patient, the full treatment would last about 20 minutes, just to give you a guideline.

Obviously the way that this is done is using firm but light sweeping strokes and the larger part of your hand you use to "pull-up" the skin, the more relaxing it is.

We call these strokes effleurage.

So, come on then. Let's have a go....just follow with me.

Let's start with some lovely light effleurage strokes on neck, always massage upwards, so as not to drag your skin.

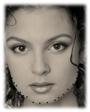
Now use your index finger to draw tiny circles along the jawline. You will feel that some of the points are tender and feel a bit sore to the touch.

Don't worry. These are accupressure points.

To empty the tension and unblock these points, just keep a gentle pressure on until the tenderness goes away. Suddenly it just won't be there anymore.

Feel along where you have tension in your jawline and really smoothe it away.
When I am stressed I grit my teeth and this can start off being a bit painful for me because it is almost locked but it is a real stress buster. How's it feeling?

Good?

I'll bet.

So now do some nice, deep, circular strokes on your chin and lower lip.

Really work at it until you feel a kind of graininess under your fingers.

This is the dead skin cells sloughing off, which we call exfoliation. This will reveal a lovely fresh new layer of skin which is much brighter and healthier looking.

If you have any doubts of how much of a difference this can make to the appearance of your skin, let me tell you that this is reputed to be one of Cleopatras very own beauty secrets and if it's good enough for the woman that is reputed to have been the most beautiful woman in all of history...then I reckon it's definately worth a go, don't you?

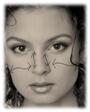
Then effleurage on the sinus areas, across your cheekbones and the sides of the nose. This will usually take some exfoliation but it is worth it. Actually facial massage here is really good if you have acne, because sinus congestion can be a big factor.

Now gently work around the ears. (Apologies for the strange diagram!) Kind of gently pinch as you gradually move up the ear.

This is very important because there are accupressure points for the entire body in your ear, in a similar representation to the reflexology points on your feet.

Ok, so as you get to the top of your ear where is all cartillidge, try to unfurl and straighten it out. Interestingly this curls inwards with stress. (Babies ears are not curly!!)

This should have you totally blissed out!!It's amazing, the power of touch, even if it's your own!

Next you want to work the accupressure points to the sinuses which are in and just above the eyebrows. There's another set just under the cheekbones. To do this trace the line along with your index finger.

To do your facial massage, do your tiny circles and feel where the blockages are. Again if it is tender...leave your finger there for a little while longer. Really pay attention to clearing them, so that you can get the energies running just right.

This will have you breathing easier in no time.

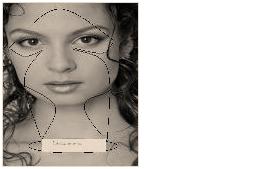
Something a bit different now. Any kind of fluid retention, for example puffy eyes is a sign that your lymphatic system is a bit sluggish. By tracing the lines across your forehead, out towards your ears and then down the side of your face to your collar bone, you can can push that lymphatic fluid into where it empties in the subclavian. (It actually empties in two places, here and in the groin).

Do the same, working from your nose, along under your eyes to the side of your face and down to the subclavian again.

The most effective method is to use your two index fingers to alternately push the fluid forwards (you may feel it under your skin).

It take a tiny bit of practice but it really reduces puffiness.

Moving up to your forehead, you can really get to work with effleurage and little circles because not only is it full of accupressure points, especially along the hairline, but also it will be absolutely full of tension.

Really stroke the stress away but be careful to exfoliate the skin here too.

The forehead is an area that will see dramatic changes from facial massage. The skin will look, smoother and brighter, but younger too because of the fresh blood supply. Smoothing out the stress and tension gives you a more relaxed and younger expression to your face. This site has lots more information about the benefits of massage therapy if you have enjoyed learning about facial massage. Relaxed and younger looking! You can't ask for much more than that can you?

When I do a facial massage I always go on to take a firm , just grip of the hair at the roots and gently tug on it and that really releases a load of tension.

Work carefully and gently around the head. It's generally better to grab a bigger handful than a smaller one, so that it doesn't hurt so much.

Tuesday, March 13, 2012

Garnier Nutritioniste: Skin Renew Awakening Face Massager

Garnier Nutritioniste: Skin Renew Awakening Face Massager

Garnier Nutritioniste: Skin Renew Awakening Face Massager is another one of Garnier Nutritioniste's handy facial tool and product in one. The daily moisturizer is massaged onto your face with a roller ball, which boosts circulation.

How to Use It

Garnier Nutritioniste: Skin Renew Awakening Face Massager is your daily and nightly face moisturizer. Instead of applying with your fingers, you simply start rolling the massage ball across your face in circular motions. This allows the moisturizer to start to roll onto your face. Garnier recommends massaging for 1 minute, then rubbing in excess moisturizer into your face with your fingers.

What We Loved

  • The massage is heaven. It's funny how such a simple concept can feel so good in the morning. Honestly, we looked forward to putting on our face cream each day.
  • Also, the scent is pleasant and bright, but definitely on the heavy side.
  • Unlike Garnier Nutritioniste's first roller product - Skin Renew Anti-Pull Eye Roller, which leaves a sticky feeling behind, this moisturizer soaked into our skin and left it feeling hydrated without a hint sticky residue left behind.
  • The light, almost watery texture of the moisturizer was a nice change from the sometimes heavy creams we put on our skin.

What We Didn't Love

  • We really wished there was an option - day or night - so that getting our first dose of sunscreen in the morning wouldn't mean using an extra product.
  • One minute doesn't seem like a long time, but when product is getting rolled onto your face, it does provide a lot of moisturizer. More than we typically put on. Yet, if you massage less to get less product, you're getting less of the massage benefits, too.
  • Because of the above mentioned, we felt like we were dousing our skin with moisturizer. And there are two cons to that. First, we're using up too much product, and it is costing us money, and two, it's taking forever to sink in and dry.

Final Thoughts

We honestly do enjoy using this product. Our solution to the abundance of product on our face was to massage for the full minute, because it felt that good, and when the time came to use our fingers to rub in the excess, we'd use a tissue to wipe some away if we thought there was too much. Not very cost effective, right?

It's a tough one for us, because we loved the experience, we loved the product itself, there were just some kinks. You might not mind kinks because it's a drugstore-priced product. But if you don't have time for kinks altogether, just take note.

Finish the Massage the Way it Began

Self Massage of the Face - Face Massage Techniques

Finish the Massage the Way it Began

Basic Face Massage Techniques

The red circles are starting and ending points for your fingers. The lines and arrows show the direction for the massage strokes. Where there are simply circles, there is little to no movement from that one area of the face.

Arlene Fleming
Finish the massage by repeating the general strokes from the top of the forehead to the chin, and sweeping your fingers off the chin at the end of each stroke.

Your hands are almost fingertip to fingertip across from each other - with each set of four fingers beginning at the center of the forehead gently stroke down and across following the outside frame of the face.

Slowly, from forehead to temples to cheeks along the jaw, and bringing the fingertips together under the chin, then sweeping the fingers off the face and beginning again at the center of the forehead.

Repeat at least 10 times.

Self Massage of the Face - Face Massage Techniques

Self Massage of the Face - Face Massage Techniques

A Little Pinch of the Ears

Basic Face Massage Techniques

The red circles are starting and ending points for your fingers. The lines and arrows show the direction for the massage strokes. Where there are simply circles, there is little to no movement from that one area of the face.

Arlene Fleming
Pinch and gently pull all over the ears by taking your thumb and index finger and using them as pincers. Start from the top inside portion of the ear and gently work your way around the contour of your ear.

In Eastern medicine, the ears are connected to the organs of the body, in the same manner that the hands and feet are in reflexology.

Stretching over the Sinuses

Stretching over the Sinuses

Basic Face Massage Techniques

The red circles are starting and ending points for your fingers. The lines and arrows show the direction for the massage strokes. Where there are simply circles, there is little to no movement from that one area of the face.

Arlene Fleming
It is not uncommon to feel stuffed up during a flight, so this part of the massage targets the sinuses on either side of your nose.

Keep your head upright and centered. Use your thumbs for this exercise. You turn your hands outward, palms facing away from you. Place your thumbs at either side of the nose, beside the flares, where you feel a slight depression. Gently push in with your thumbs. You drag your thumbs across the sinuses as outlined by the red lines in the illustration, and maintain an even pressure throughout. Keep your thumbs on the face for the entire motion.

While pulling your thumbs slowly across the maxillary sinuses (named for their location on the face, essentially the cheek bones) you may feel them clear a little or drain. This motion should be done very slowly and take you at least 15 - 20 seconds. Count quietly if you need to. Repeat several times if you wish.

To encourage drainage if one side feels more clogged than the other, gently tilt your head towards the side that feels less full. So if my left maxillary sinus seems more clogged up, I may even repeat this massage stroke after I have already done it on both sides. In this case I would tilt my head slightly down to the right to promote drainage of the left, and would only do the massage stroke along the left side.

Target the Temples

Target the Temples

Basic Face Massage Techniques

The red circles are starting and ending points for your fingers. The lines and arrows show the direction for the massage strokes. Where there are simply circles, there is little to no movement from that one area of the face.

Arlene Fleming
Beyond the curve of your eyebrows, at each side of your face you will feel an indentation, almost like a hole. These are your temples, and where the next bit of pressure will be applied, again with the gentle pressure you used in step 3.

Use your thumbs or your index fingers and simply apply and hold pressure over these two points for at least 30 seconds.

It is no surprise that people often start rubbing their temples when they feel the pressure and discomfort for a headache. In fact, the point along the temples is often used for the treatment of headaches.

Gentle Pressure Between the Eyebrows

Gentle Pressure Between the Eyebrows

Basic Face Massage Techniques

The red circles are starting and ending points for your fingers. The lines and arrows show the direction for the massage strokes. Where there are simply circles, there is little to no movement from that one area of the face.

Arlene Fleming
We continue more specifically by placing your index fingers just above the nose and in between the eyebrows. You can rest your head in your hands as you do this if it is more comfortable for you.

Apply about the pressure of squeezing a fresh lemon when pushing your index fingers into the spot between your eyebrows. Hold for at least 30 seconds and breathe deeply.

If you were to go directly behind the bone at this point, deep in the center of the skull, you would reach the pineal gland which is often referred to as the third eye in many cultures and is thought to have some influence over your circadian rhythm (the sleep-wake cycle affected by night and day).

In Chinese massage, for example, applying pressure and gently rocking a finger or thumb over this point is believed to calm the mind, and aid with insomnia. Frontal sinuses basically extend over the eyebrows so this is the center point where they almost meet.

Self Massage of the Face - Face Massage Techniques

Self Massage of the Face - Face Massage Techniques

Basic Face Massage Techniques – Forehead to Chin

Basic Face Massage Techniques

The red circles are starting and ending points for your fingers. The lines and arrows show the direction for the massage strokes. Where there are simply circles, there is little to no movement from that one area of the face.

Arlene Fleming
Begin the face massage with very general strokes. Take your hands, which were covering your face, and bring the fingers up to your forehead - almost fingertip to fingertip across from each other - with each set of four fingers beginning at the center of the forehead gently stroke down and across following the outside frame of the face.

Your thumbs will naturally start the motion along the sides of the face and slide underneath the chin.

Slowly, from forehead to temples to cheeks along the jaw, and bringing the fingertips together under the chin, then sweeping the fingers off the face and beginning again at the center of the forehead.

Repeat 5 to 10 times.

The Shiseido Facial Massage

The Shiseido Facial Massage

Use your ring and middle fingers to ensure soft, even pressure. Remember to work with light, gentle strokes. Massage slowly and rhythmically, matching your movements to your breathing. Slow down the pace as your massage progresses.

Step 1: Forehead - Tones muscles to prevent the formation of horizontal lines.

Starting at the center of forehead, gradually move fingers across the brow in 6 complete circular motions. Repeat 3 times. Finish by gently pressing the pressure points at the temples for 3 counts. To locate your pressure points, feel for slight depressions between the bones at the temples. Pressure applied should feel pleasant and invigorating, never painful.

Step 2: Nose - Prevents the formation of horizontal lines.

Slide fingers downward along the sides of your nose, starting from the inner hollow of the eye. Use left hand to massage the right side of the nose, and the right hand for the left side. Repeat 3 times on each side of nose.

Step 3: Nostrils - Helps unclog pores and prevent blackheads and blemishes.

Circle back and forth around nostrils, applying extra pressure during the upward stroke. Repeat 6 times.

Step 4: Mouth - Minimizes lines around mouth and sagging at lip corners.

Massage along the lower lip, moving outward and upward to lift the corners of the mouth. Release gently. Repeat 3 times.

Step 5: Cheeks - Helps prevent sagging.

Massage outward from the chin to the earlobe, in 6 circular motions, focusing on the jawline. Glide fingers to corners of the mouth and massage up to the middle of the ear. Glide again to the nostrils and massage to the temples. Glide back to chin and repeat all steps 3 times. Finish by pressing the pressure points at your temples.

Step 6: Eyes - Prevents the formation of wrinkles and sagging under eyes.

Makes eyes look less tired by minimizing dark circles and puffiness. First, press the pressure points just under the brow bone below the inner eyebrows and count to 3. Then glide fingers under brow, around and under the eyes, and back to the starting point in 6 counts. Repeat entire procedure 3 times, moving gently over the eyelid to press at temples on the final count.

Step 7: Neck - Prevents the formation of horizontal lines and sagging.

Helps ease tension and stiffness at the nape. Using the palms of your hands, massage your neck by gently stroking upward from the collar bone to the base of the chin. Alternate hands as you move from the center to either side with 6 strokes out, then 6 strokes back. Glide lightly at the center of the neck and increase pressure as you move outward.

Step 8: Chin - Tones muscles to prevent sagging.

Grasp your chin between your index and middle finger at the jaw, and gently slide your fingers across the length of your jaw, creating a scissor-like motion. Bend index finger and place it under the jaw. Use the side of the index finger and pad of the thumb, massage back to right ear. Repeat with left hand. Repeat entire procedure 6 times.

Step 9: Ears - Regulates the body's overall balance through stimulation of pressure points that send reflexes to other parts of the body.

Massage upward in spiral motions, using the thumb and index fingers, counting to 5. On the 6th count, slide your thumb down the jaw as close to the ear as possible, and back to the earlobe to stimulate the numerous pressure points in this area. Repeat 3 times.


For more information or a demonstration by a Shiseido Beauty Consultant
please visit your Shiseido counter.

Massage Yourself a Face-Lift

Massage Yourself a Face-Lift

You don’t have to pay huge sums of money for a facial massage that will enliven your complexion, tone and condition your skin, relax your facial muscles, improve circulation, break down fatty deposits, release toxins, reduce wrinkles, and leave your skin feeling smoother and more vibrant. All it takes is a tiny bit of know-how.

These simple massage techniques are all-n/atural, as well as non-toxic and non-invasive, and they feel absolutely wonderful. The do-it-yourself way to healthier, more beautiful skin, right here:

Use a simple all-natural lotion or oil to facilitate the movement of your fingers on your skin (olive oil will do beautifully). Be sure to do this massage with clean hands and face, and leave your face damp before you begin. Pull your hair away from your face and have a small bowl of your lotion or oil at hand.

The 3 Basic Techniques:

1. Use the tips of the index, middle, and ring fingers together to exert a deep, local pressure in a tiny circular movement. You should be able to feel the skin rubbing against the small muscles of the face. Lift the fingers and reposition them to travel across the skin.

2. Use the flat pads of the index, middle, and ring fingers together or simply the thumb to travel across the skin–either in a slow, spiraling action, or by simply sliding upward, downward, or outward. For the most part, keep the remainder of your hand resting lightly on your face.

3. Pinching: Use your finger and thumb lightly but with enough strength to stimulate the circulation and cause as light change of skin color. Beware of bruising–pinch lightly on the eyebrows and upper face, more heavily along the jaw.

Basic Massage:

Warm-Up Starting on either side of your nose, pinch along each eyebrow and as far as possible along the temples toward the tops of the ears. Then pinch from the chin, working slowly along the jaw line and up to the base of the ears.

1. Dip the pads of your fingers in the oil and rub your palms together to spread it evenly. Place your fingertips on your jawbone and with light pressure, make a large, sweeping circle from the jaw line up either side of your nose to the center of the forehead, out along the hairline, and down the temples to meet at the jawbone. This gently stimulates energy and spreads the oil.

2. Using Technique 1, start at the chin and travel along the jaw line and then up from the angles of the jaw to the temples.

3. Using Technique 2, begin on each side of the nose, close to the base of the nostrils, moving first under the cheekbones and then up toward the tops of the ears.

4. Placing the tips of the middle fingers at the inner corners of the eyes, slide your fingers upward, pushing against the orbital bone, and then outward, just above the eyebrows, towards the ears.

5. Use Technique 2 to massage the forehead, starting just above the top of the nose, moving up toward the hairline, and then outward until you reach the temples.

6. Using Technique 2, position the pads of all three fingers at the base of the central frown line, just above the top of the nose, and slide them toward the temples.

7. Massage your scalp firmly, as if you were shampooing your hair. Begin at the temples and work downward, behind the ears and towards the base of the skull.

8. Resting your palms on your ears so that the thumbs point downward, massage from your throat to the nape of the neck in a broad, spiraling version of Technique 2.

9. Place one hand, palm down, on each side of your nose. Your fingertips should rest slightly above your eyebrows. With firm, even pressure, slide your hands outward toward the ears.

10. Bring the sequence to an end by repeating the sweeping movement described in step 1.

How to Massage a Face

How to Massage a Face

X
Barbara Burgess
Barbara Burgess has worked as a freelance writer for over 10 years. She has ghostwritten numerous articles, is currently working on her first children book, and has been writing for Demand Studios since 2008. Barbara studied English at Florence-Darlington Technical College.

A facial massage promotes the feeling of well-being and is one of the oldest massage techniques for general healing. A regular facial massage gives your skin the look of a smoother, firmer, radiant appearance. Learn how to massage the face to increase moisture balance and eliminate toxins and impurities from your skin.

Difficulty:
Easy

Instructions

things you'll need:

  • Massage oil
  • Relaxed atmosphere
  • Soft music
  1. How to Massage a Face

    • 1

      Prepare yourself and surroundings. Purchase or prepare your own massage oil. Thoroughly clean your face and smooth on massage oil. Set the tone of calmness by dimming lights, maybe even putting on some soft relaxing music.

    • 2

      Use your fingers. You will use three fingers to perform a face massage; the three fingers to use are the index, middle, and ring fingers on both hands. Your strokes will move in an upward motion to the extent possible as some areas of the face may require you move in a slightly different direction. However, when possible always move skin against the force of gravity.

    • 3

      Work the forehead. Place your fingers right above your eyebrows; with a gentle circular motion move your fingers across the forehead giving complete coverage. Repeat step four or five times.

    • 4

      Chin up. This time starting at your chin and moving upward in a gentle circular motion using your index and middle fingers. Massage upward towards and around the mouth and top of lips under your nostrils. Repeat motion five times.

    • 5

      Cut the fat. Using your forefinger and middle fingers, position them as if they were a pair of scissors. Starting where your jaw meets your ear, gently grasp the skin in this area between your scissor fingers; work your way down the jaw in a cutting motion. From the end of the jaw, massage back up to the ear using circular motions. Repeat five times. This process helps to reduce the fatty deposits that collect in this area.

    • 6

      Go to the temple. Starting at your chin, massage up to your cheeks using the middle and index fingers. Continue massaging up to the temple, massage in a circular motion. Repeat five times. Your face should feel renewed and relaxed.

  • Fight the 7 Signs of Ageing Today Order Your Free Sample Online Now!


Monday, March 12, 2012

The basic elements of aromatherapy are essential oils.

The basic elements of aromatherapy are essential oils.
Essential oils are defined as the essence of a plant
and are strong and volatile in nature.
These essential oils are extracted by different processes.


However, currently the most common form of distillation is steam distillation.
Essential oils are usually too strong to be used by themselves
and require a carrier oil made of vegetables, nuts or seeds.


Organic essential oils are safer for therapeutic use.
Some common applications of essential oils for the purpose of aromatherapy
are oils, baths, facials, massage, candles and ambient fragrances.
Any of these methods can be used as holistic therapy
for the mind, body and spirit.

When using essential oils in massage, always dilute the oils
in a carrier oil prior to application to the skin.
Essential oils are very powerful concentrates, and unless indicated otherwise,
should not be directly applied to the skin.


Essential oils should never be used undiluted on the skin.
There are instances when experienced aromatherapy users and practitioners
make exceptions to this precaution, but only once significant essential oil
knowledge is gained should you ever attempt to apply it undiluted.


Lavender and tea tree are listed by a large number of aromatherapy sources
as being oils that can be used undiluted. Undiluted use of lavender and tea tree,
however, should only be done on rare occurances as severe sensitivity
still could occur in some individuals.
Again, the safest rule of thumb is to never use any essential oil undiluted.


If properly cared for, essential oils can have a shelf life up to seven years.
Direct sunlight and exposure to air are most damaging to essential oils.
Keep your oils out of the sun and make sure the caps are tightly secured.
Try to keep your oils in a cool dry place.
They are sensitive to extreme temperature changes.


A trained aromatherapist can help you find the right essential oils
at the right concentrations for your particular needs.

Homemade Anti-Dandruff Rosemary Preparation:


Homemade Anti-Dandruff Rosemary Preparation:


*1 handful Rosemary Leaves

*1 litre water

*2 tsp.Vinegar


Boil the water and soak rosemary leaves in it. Let it stand for one night.
Strain and add vinegar to it. After shampooing, wash your hair with
this preparation. It treats the hair very fast.

How to apply acrylic nails:

How to apply acrylic nails:

• First off all you need to prepare your nail by giving it a really neat manicure,
to remove all the dead skin and to smooth out rough edges.

• Then remove all previous traces of polish and acrylic
with a non-acetone nail polish remover.

• Roughen nails up with a filing block, and trim nails back to the skin,
not too far though. The reason of cutting your nail back to the skin
is that if the tip of your acrylic nail decides to break,
it's not going to take half of your nail off with it.

• Set your acrylic nail tips out next to your glue ready to apply.

• Apply just a drop of glue on the tip, from the bottom up
to the little indentation where the edge of you nail should go.

• If you apply the acrylic nail wrong you can quickly remove it
by soaking it in water.

• Adjust the acrylic nail's length to suit your needs,
using either an artificial nail tip cutter or toenail clippers.
File down the rough edges as well, and compare them
with the rest of your nails, making sure they're even

• Pour the liquid acrylic into your dish, this stuff is very potent
so open a few windows as it can give you quite a headache when you apply it!
Open you container of powder, dip your brush into the liquid acrylic,
wipe both sides on paper towel. Then dip the brush in the liquid again
and wipe against the side of the container as you would with your nail polish.

• Dip the tip of the brush into you powder; a little ball of product should form.
It should be damp, but not too wet, apply this ball on the edge
of the acrylic tip and your natural nail.

• Quickly spread it out and smooth it in, but be careful not to flatten it though,
wipe your brush to remove excess product.

• Then repeat the steps over and over to build and copy the natural curve
of your nail, apply a coat to the tip as well, just not as thick.
However be careful NOT to apply any acrylic onto the cuticle area!
You could develop a mold or fungus under the nail if it lifts.

• After your acrylic has set, and dried, (it should take no longer than ten minutes)
file the sides of the nail and close to the cuticle with a grit nail file,
then shape the nail too look natural.

• Smooth your nail with a filing block then scrub them with soapy water
and a nailbrush to remove any dust and filings.

• Remember to apply some nail oil on your cuticles as you just exposed
them to chemicals and buffering and they will need to retain their moisture.

• However every two weeks you will need to reapply some acrylic
to your nails as your nail will grow and move the acrylic nail up.

Sunday, March 11, 2012

Beauty takes many forms

Beauty takes many forms. One person's vision of beauty is often shockingly
different from another's, particularly across cultural boundaries.
Beauty is variable. Aging is an entirely different matter.


The natural deterioration of the skin begins in your twenties,
when the outward signs are absent and you still look great.
At this point, your efforts to deal with the process will bear fruit
for a future that you haven't yet considered. At any point of intervention,
you will certainly look better than if you hadn't started at all.


Think of the skin as a form-fitting garment, like tights.
They hug your body, move when you move, and as you move. After exposure to
multiple washings, and thousands of bends and folds, the tights begin to sag and
generally loosen all over. That was a description of how your tights age;
it's worse for your skin.


Stop smoking - it depletes your skin of vital nutrients,
creates toxins in the body that hasten the aging process,
thus depriving you of good complexion.


A weekly or bi-weekly exfoliating treatment and hydrating
face mask will do wonders to keep your complexion clear
and glowing. Use a mask that is suitable for your skin type.


Don't gain and lose weight too quickly.
Maintaining a relatively constant weight makes great sense
for a volume of reasons. The main reason is that the skin will
not respond to weight loss by shrinking, and will look loose,
empty, and haggard.


The best tactic is to achieve one's optimal weight and stay
there. That needn't be model slim or unrealistic for you,
but a good and healthy level that your body can adjust to.


All the knowledge we have accumulated about aging cannot stop the process,
but we can avoid accelerating it, and even slow it down. We can even control
the signs and symptoms of aging before they start. And you can keep looking
your best right through the very enjoyable middle years, but you must start early.

The earlier the better.


The objective is prevention. Once wrinkles are written into the skin,
they can never be fully eliminated. Though we can now reduce the depth
of wrinkles and make them less apparent, they still remain a singular reminder
of the wear and tear one suffers over the years.
Therefore, we must prevent them before they start.

Aging is just a natural part of life.

Aging is just a natural part of life. But even if you're getting older it doesn't
mean you have to appear like it. By taking a few simple steps you can
look and feel younger than you actually are.


One of the most effective things you can do in the battle against age
is to simply lead a healthy lifestyle. Anti aging health is really
all about your lifestyle, what you eat, your general level of fitness,
and a few other factors which will affect how well you age.
Keeping up this type of lifestyle does require a degree of commitment
and dedication on your part.


A vital step in beating the effects of old age is having healthy eating habits.
It's very important not to eat too much of any one food type,
particularly if it contains a lot of fat or grease. Each person is different
in their dietary needs, and it's very important to discover
which food types that best suits you.


A balanced diet is one of the main factors in slowing the aging process
to some measure, and the more effective and healthy your body,
the less work it has to do to do to maintain health.

Perhaps the next most important thing in anti aging health is your lifestyle.
Smoking, alcohol consumption, also some eating disorders may affect
the way a person ages. I am not suggesting that you need to give up everything
that makes life pleasurable, but it is vitally important that, if you are concerned
with your health and wish to reduce the signs of aging you must have
a healthy lifestyle.


Exercise is considered by many experts to be one of the most
important considerations in anti aging. Gentle exercise taken in
moderation provides the body with many benefits. For instance,
it stimulates the blood flow, builds healthier muscles and increased
bone stability, thus helping to off set the effects of osteoporosis.


If you want to help reduce the effects of aging you will benefit from
a regular exercise program. Set moderate objectives, as trying to overdo
things at first is not a good idea and will probably cause more harm than good.


There are several thing to consider in the battle against aging,
but if you are concerned with your age and health, these tips might help.


Applying Eye Makeup for Dark Skin:

Applying Eye Makeup for Dark Skin:


Dark comlexions also have dark circles, so that's why using a concealer is
very important. Apply it both underneath the eyes and above the eyes.


Apply a color olive green. Do the whole lid and don't go too high just yet
and then build up at the corner,keeping it still soft and light.


Highlight a little bit at the bottom, so you can see that nice green. It's really all
in the application because you don't want to pick up a lot of color,
you want to start with a little bit and then build up.


Then go straight to the liner. You can use a concealer brush and wet it
with water and pick up the cream liner right now and add that touch
before you do the last step.


Color in the roots of the lashes. On medium to darker skin tone you can
get away with using a lot of different colors. You can use a black, purple,
midnight blue, dark green. As long as the color is dark, so that it shows up.

Applying Powder for Dark Skin

Applying Powder for Dark Skin: For a dazzling glow, play with golden shimmer
that sparkles beautifully on matte skin. Beige and ivory add light, rosy and pink
shades are delicate and silky if you like a romantic look,
and shimmering pink reflects light for a gorgeous harmonious base.


Applying Foundation for Dark Skin

Applying Foundation for Dark Skin: Lightly apply a little bit on the T-zone.
If you have smooth skin, you don't need a lot, you'll just want to even it out
a little bit. Choose a foundation color that has some yellow in it.
Go for variations on beige with light reflecting shimmer, peach for a healthy glow,
and golden ochre to illuminate your face. You only want to apply
where it is necessary, not underneath your throat or anything like that.
We're only just retouching and evening out the skin tone.

Applying Concelaer for Dark Skin:

Applying Concelaer for Dark Skin: Aside from hiding dark circles under the eyes,
it’s also brilliant at covering up imperfections and blemishes.
Application: To cover up imperfections, apply concealer in small quantities
over under eye circles and your T-zone, then use your finger to blend
outwards towards the edge of your face until your skin absorbs it.

How to Apply Makeup For Photos:

How to Apply Makeup For Photos:


Everybody wants to look great in photos and pictures.
Unfortunately not everyone is blessed with a natural beauty –
some of us have to work harder in order to look great in photos,
some have to conceal blemishes /pimples, discolorations, large pores/,
other have to change their hairstyle and clothing.
If you are going to be photographed do not forget to take
your makeup bag with you as you will need a few makeup products.


A good makeup primer will hide imperfections like, large pores, small pimple,
skin discolorations, spots, freckles and so on. There are even eyelid primers
that conceal the yellowing hints under your eyes.


Before you apply makeup, start with smooth, toned and moisturized skin.
If necessary, give yourself a facial or scrub treatment. This minimizes uneven
or artificial looking makeup application and promotes a healthy, glowing look.


As photos are two-dimensional, the camera ages subjects by enhancing dark,
fine lines and wrinkles. To compensate, gently apply a lighter shade
of concealer makeup to darker areas: around the eyes, crevices
and expression lines.


Using upward strokes, next apply a light layer of foundation makeup
over the face including lips. Blend makeup at the edges.
Except for corrective work, use foundation makeup colors
closely matching the natural skin color.


Unless you like the look, or have the eyes for it, avoid harsh lines,
or the raccoon look, it makes the eyes look smaller and deeper set.


Try a smoky-colored eyeliner pencil, and smudge a bit if necessary.
With liquid eyeliner, an option is to dot the eyeliner next to the eyelash
base rather than create a solid line. For a different look, limit liquid
eyeliner application to the top eyelid and/or the outer corners of the eyes.


Smoky eye shadow applied above the eyelids and blended with the outer
corners of the eyes also creates a desirable effect; a highlighted
brow area enhances this effect.


Most lips benefit from definition, even when lipstick is not generally used.
For a natural but polished look, try a shade or two darker than your lip color,
apply lip pencil, smudge lips a bit and apply a little gloss, or lipstick.


The key is to consider that images are two dimensional, so shadows
and highlighted areas may need to be emphasized, de-emphasized
or even simulated, for the best overall effect. Employ makeup tips
for problem areas based on your photo experience with similar
lighting conditions and adjust accordingly.

Heart-Shaped Face:

Heart-Shaped Face: Characterized by a narrow, “pointy” chin, wider
forehead and round cheekbones. Apply contour on the temples and slightly
above cheekbones and highlighter on the center of forehead and tip of chin.

Pear-Shaped Face

Pear-Shaped Face: Characterized by a slightly wider chin and jaw line
than the forehead. Apply contour along the jaw line, on the tips of the lower
jaw and along the sides of face. Apply highlighter on the center of forehead
and tip of chin.

Saturday, March 10, 2012

Round Face

Round Face: Characterized by fuller cheeks, a short, wide forehead
and round chin. Apply contour shade on the temples, along the sides of the face
and two finger’s length below the cheekbones. Apply highlighter down the center
of the nose, under eyes and tip of chin.

How To Achieve An Oval Face Shape By Using Adequate Makeup?

How To Achieve An Oval Face Shape By Using Adequate Makeup?


In the beauty world an oval shaped face is considered the ideal shape for women.
Those who are not born with this shape should still celebrate their unique and
individual looks, but for those who would like to achieve the oval shape,
here are some contouring and highlighting tips for each facial shape.


• Start with applying your usual concealer, foundation and loose facial powder.
Then, before continuing with makeup colors, use tools such as contouring powder approximately 1-2 shades darker than your skin tone, a highlighting powder,
a blush brush and a large powder brush.
Square Face: Characterized by a slightly wider forehead and an equal
measurement of the jaw line. Apply the contouring shade above the temples
and lower tips of the jaw (beneath the earlobes). Apply highlighter on the center
of the forehead, under the eyes and tip of chin.

lips look best if you outline them with a lipliner first and then apply your lipstick.

lips look best if you outline them with a lipliner first and then apply your lipstick.
Take a Kleenex, put it between your lips and gently close your lips
the way you normally would close them, to remove excess lipstick.
This will prevent the embarrassment of having lipstick on your teeth.


You may wish to try a lipstick sealer.
Brush it over your lipcolour and let it dry for one minute.
Your lipstick will never bleed or feather into your liplines.

Keep your lips smooth. Moisturize them every night.


A matte lipstick looks very sexy and also stays on much longer,
especially if you have a lot of lines around your mouth.


Brush some oil-free powder foundation over your lashes

Brush some oil-free powder foundation over your lashes
then apply your mascara.
The mascara will stay on much longer.
Let the mascara dry a bit before applying the 2nd coat for a thicker look.


Don't use waterproof mascara every day.
It's very hard to remove and will take out your lashes as well.
Lashes take a long time before they grow in again.


You can get your eyelashes dyed.
It will last about 4 - 5 weeks.


Try experimenting with different colors: maybe brown, navy or green.


To get the most of your mascara brush, try twirlinng,
as pumping will cause it to dry out sooner.


If your mascara is new, yet you notice some deposit on the wand,
tissue off the wand before applying to prevent smudging.


When applying more than one coat,
combing through lashes will help prevent clumping.

Using the proper application technique when applying mascara
is extremely important when you are trying to achieve a finished look.


Make sure that the mascara covers the lashes from the root
to the tip of the lash.

Before using eye shadows on the lids,

Before using eye shadows on the lids, always test the colours
on the back of the hand to see the intensity.
Remember, pale tones emphasize, while deep sooty shades define.


Apply an oil-free powder foundation on top of your eyelids
before applying your eyeshadow.
The eyeshadow will last all day without settling in the crease.


Choose a primary colour (the colour you want to stand out the most)
and use short strokes to cover your whole eyelid.

Apply just enough pressure to lay the colour down without caking it onto your lids.
Be especially careful not get too close to the crease or your eyebrows.


Smokey eyes are very sexy.
With the right colours you can make your eyes stand out.
You can basically work with 3 colours: a light, a medium and a dark(er) shade.
For example, gentle earthtones are very flattering to any skin types.


Try it as a base eyeshadow.
Apply it all over your eyelid.


Apply the medium shade of a taupe for example or a medium brown
between the lashes and the crease and use a darker taupe, bronze,
brown or grey in the crease.


Use the darkest eyeshadow to draw a line right along the
lashes with a thin flat brush instead of an eyeliner
or a pencil to create a smokey look.


Don't draw the line all the way to the inner corner of the eyes,
just go 1/2 way or even less.


Sparingly apply a lighter eye shadow colour above your primary colour
and below your eyebrow.
You should be able to cover the entire area in one sweep.


To give your eyes a 'smoky' look, choose a dark blue,
grey or black eye shadow and brush it around the outer corners
of your eyes and blend it into your primary eyeliner.
Don't stray further than a quarter inch away from your eyes.